Integrating Weaverse into Your Shopify Hydrogen Project

Introduction
Are you working with Shopify Hydrogen and looking for a way to make your online store more customizable? Weaverse is here to help. It’s a tool that makes it easy for you and your clients to customize a Shopify store without needing to know how to code. Let’s go through the steps to integrate Weaverse into your Shopify Hydrogen project.
Why Weaverse?
Weaverse is great for when you’re building a Shopify store for clients who want a modern, easy-to-customize online store. Hydrogen’s tech is powerful, but it can be hard for clients to make changes by themselves. Weaverse makes this a lot easier.
Getting Started
First, let's set up your Shopify Hydrogen project. Open your command line and enter:
npm create @shopify/hydrogen@latest
After setting up, go to your Hydrogen project folder and start it with:
npm run dev
Now you will see your Hydrogen storefront running like this:

Integrating Weaverse: Step-by-Step
Step 1: Install Weaverse
Begin by adding Weaverse to your project. Enter the following command:
npm install @weaverse/hydrogen
Step 2: Create the Weaverse Directory
Next, you need to set up a directory for Weaverse in your project’s app folder. Create two files:
weaverse/component.ts – This file is for registering components in Weaverse. Start with an empty array.
// weaverse/component.tsimport type {HydrogenComponent} from '@weaverse/hydrogen';export const components: HydrogenComponent[] = [];
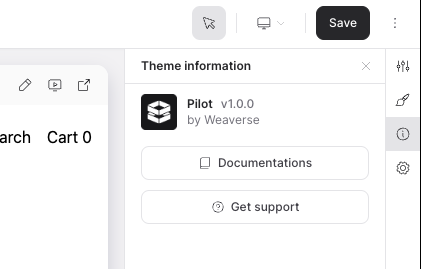
weaverse/schema.ts – This file is where you define Project/Theme information so that users can later find that information in the Project information section in the Weaverse app.
// weaverse/schema.tsimport type {HydrogenThemeSchema} from '@weaverse/hydrogen';export const themeSchema: HydrogenThemeSchema = {info: {version: '1.0.0',author: 'Weaverse',name: 'Pilot',authorProfilePhoto:'https://cdn.shopify.com/s/files/1/0838/0052/3057/files/Weaverse_logo_-_3000x_e2fa8c13-dac2-4dcb-a2c2-f7aaf7a58169.png?v=1698245759',documentationUrl: 'https://weaverse.io/docs',supportUrl: 'https://weaverse.io/contact',},inspector: [],};
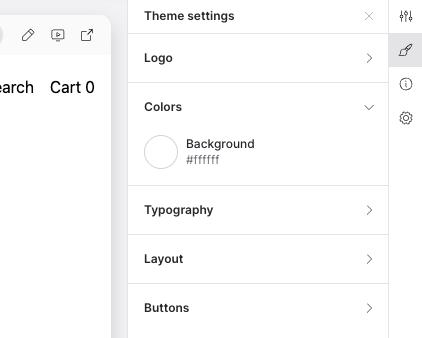
At the same time, this is also where you will define Global Theme settings, similar to how you use settings_schema.json in Dawn theme (Shopify theme). I have also left a few settings available so you can expand them later. Below is an example image of my theme settings:
Step 3: Set Up a Weaverse Client
Create a weaverse/weaverse.server.ts file. The “server.ts” extension indicates that the code within is intended for server-side execution. This distinction is crucial for maintaining a separation between server-side and client-side logic, ensuring better security and performance.
// weaverse/weaverse.server.tsimport type {WeaverseClientArgs} from '@weaverse/hydrogen';import {WeaverseClient} from '@weaverse/hydrogen';import {components} from '~/weaverse/components';import {themeSchema} from '~/weaverse/schema';export function createWeaverseClient(args: WeaverseClientArgs) {return new WeaverseClient({...args,themeSchema,components,});}export function getWeaverseCsp(request: Request) {const url = new URL(request.url);// Get weaverse host from query paramsconst localDirectives =process.env.NODE_ENV === 'development'? ['localhost:*', 'ws://localhost:*', 'ws://127.0.0.1:*']: [];const weaverseHost = url.searchParams.get('weaverseHost');const weaverseHosts = ['weaverse.io', '*.weaverse.io'];if (weaverseHost) {weaverseHosts.push(weaverseHost);}return {frameAncestors: weaverseHosts,defaultSrc: ["'self'",'cdn.shopify.com','shopify.com',...localDirectives,...weaverseHosts,],imgSrc: ["'self'",'data:','cdn.shopify.com',...localDirectives,...weaverseHosts,],styleSrc: ["'self'","'unsafe-inline'",'cdn.shopify.com',...localDirectives,...weaverseHosts,],connectSrc: ["'self'",'https://monorail-edge.shopifysvc.com',...localDirectives,...weaverseHosts,],};}
In this file, you’ll include:
-
createWeaverseClient: For interacting with the Weaverse API. -
getWeaverseCsp: For managing content security policies, ensuring your app adheres to best practices in web security.
Step 4: Render Weaverse Content
Add a weaverse/index.tsx file to render Weaverse content. This file acts as a bridge between your Shopify Hydrogen project and the dynamic content managed through Weaverse.
// weaverse/index.tsximport {WeaverseHydrogenRoot} from '@weaverse/hydrogen';import {components} from './components';export function WeaverseContent() {return <WeaverseHydrogenRoot components={components} />;}
Completing the Integration
Once you've set up the necessary files, it's time to fully integrate Weaverse into your Hydrogen project:
Integrating weaverse in Remix's Global Context
In your server.ts file, incorporate weaverse into Remix's global context. This is done by defining weaverse in the fetch handler of Remix, ensuring it's accessible throughout your application. This step is crucial for making sure Weaverse functions correctly within your project.
// server.ts// ...import {createWeaverseClient} from '~/weaverse/weaverse.server';// .../*** Create Hydrogen's Storefront client.*/const {storefront} = createStorefrontClient({/** ... */ });const weaverse = createWeaverseClient({storefront,request,env,cache,waitUntil,});/*** Create a Remix request handler and pass* Hydrogen's Storefront client to the loader context.*/const handleRequest = createRequestHandler({build: remixBuild,mode: process.env.NODE_ENV,getLoadContext: () => ({session,storefront,cart,env,waitUntil,weaverse, // add weaverse to Remix loader context}),});
TypeScript Error Handling: If you encounter a TypeScript error like TS2739, indicating that Type Env is missing properties from type HydrogenThemeEnv, don't panic. Simply add the missing properties to HydrogenThemeEnv in your remix.env.d.ts file. This step ensures your TypeScript environment recognizes the new Weaverse elements.
declare global {/** ... *//*** Declare expected Env parameter in fetch handler.*/interface Env {/** ... */WEAVERSE_PROJECT_ID: string;WEAVERSE_API_KEY: string;}}
Also, define weaverse in the AppLoadContext interface to ensure it's recognized as part of your application's context.
declare module '@shopify/remix-oxygen' {/*** Declare local additions to the Remix loader context.*/export interface AppLoadContext {env: Env;cart: HydrogenCart;storefront: Storefront;session: HydrogenSession;waitUntil: ExecutionContext['waitUntil'];weaverse: WeaverseClient;}/** ... */}
Implementing getWeaverseCsp
Open your app/entry.server.tsx file and utilize the getWeaverseCsp function. This function is crucial for managing your content security policy, which is a key aspect of web application security.
// app/entry.server.tsx// ...import {getWeaverseCsp} from '~/weaverse/weaverse.server';// ...const {nonce, header, NonceProvider} = createContentSecurityPolicy(getWeaverseCsp(request),);
Updating app/root.tsx for Weaverse Theme Settings
In the app/root.tsx file, add weaverseTheme data to the loader function’s return value. This addition is vital for enabling Weaverse theme settings within your application.
// app/root.tsxexport async function loader({context}: LoaderFunctionArgs) {/** ... */return defer({/** ... */weaverseTheme: await context.weaverse.loadThemeSettings(),/** ... */},{headers},);}
Next, wrap your App component with the withWeaverse function. This wrapping is necessary because withWeaverse provides your App component with the Global Theme Settings Provider that you can use everywhere from the App context.
function App() {const nonce = useNonce();const data = useLoaderData<typeof loader>();return (<html lang="en">/** ... */</html>);}export default withWeaverse(App);
Handling Remix Routes for WeaverseContent
For rendering WeaverseContent on routes, include weaverseData in the return result of the loader function. This ensures that the dynamic content from Weaverse is properly loaded and displayed on each route.
// app/routes/_index.tsx/** ... */import {WeaverseContent} from '~/weaverse';export async function loader({context}: LoaderFunctionArgs) {const {storefront} = context;const recommendedProducts = await storefront.query(RECOMMENDED_PRODUCTS_QUERY,);/** ... */return defer({recommendedProducts,weaverseData: await context.weaverse.loadPage(),});}export default function Homepage() {return (<div className="home"><WeaverseContent /></div>);}
In your route components, explicitly render WeaverseContent. This direct rendering allows for the customized content to be displayed as intended.
Migrating Components to Weaverse
Begin migrating your default components to Weaverse Components. This migration will enable these components to utilize the dynamic customization features provided by Weaverse.
Connecting to Weaverse CMS
Ensure the Weaverse Hydrogen app is installed in your Shopify store. Create a storefront, copy the Weaverse Project ID, and add it to your Hydrogen project's .env file. This step connects your project with the Weaverse CMS.

Now start the development server and update the Preview URL in Weaverse Project settings. By default, our Weaverse projects are set to http://localhost:3456.
# .envSESSION_SECRET="foobar"PUBLIC_STORE_DOMAIN="mock.shop"WEAVERSE_PROJECT_ID="your-project-id-here"
Once saved, you should see your Hydrogen page loaded in Weaverse Studio.
Customizing Sections with Weaverse
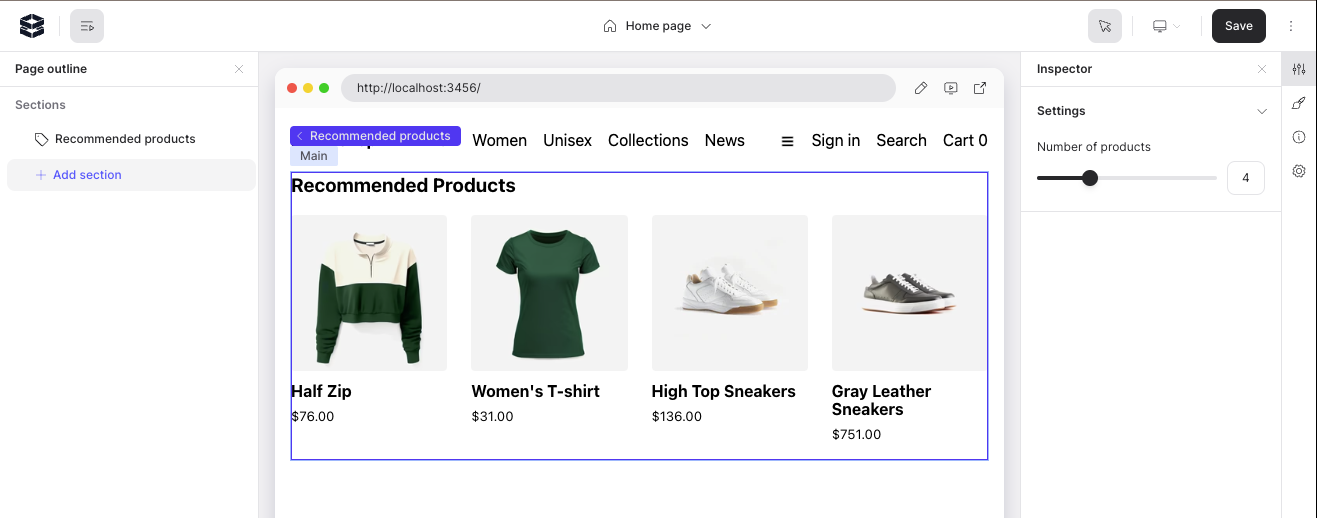
Begin by creating a recommended-products.tsx file in the app/sections folder. Adapt the original RecommendedProducts component to a forwardRef component. This adaptation allows Weaverse Studio to identify and edit the component more easily.
// app/sections/recommended-products.tsximport {forwardRef} from 'react';import {Link, useLoaderData} from '@remix-run/react';import {Image, Money} from '@shopify/hydrogen';const RecommendedProducts = forwardRef<HTMLDivElement, {productsCount: number}>(({productsCount}, ref) => {const {recommendedProducts: {products},} = useLoaderData<any>();const displayProducts = products.nodes.slice(0, productsCount);return (<div className="recommended-products" ref={ref}><h2>Recommended Products</h2><div className="recommended-products-grid">{displayProducts.map((product: any) => (<Linkkey={product.id}className="recommended-product"to={`/products/${product.handle}`}><Imagedata={product.images.nodes[0]}aspectRatio="1/1"sizes="(min-width: 45em) 20vw, 50vw"/><h4>{product.title}</h4><small><Money data={product.priceRange.minVariantPrice} /></small></Link>))}</div><br /></div>);},);export default RecommendedProducts;export const schema = {type: 'recommended-products',title: 'Recommended products',inspector: [{group: 'Settings',inputs: [{type: 'range',name: 'productsCount',label: 'Number of products',defaultValue: 4,configs: {min: 1,max: 12,step: 1,},},],},],};
And the result:
That concludes our basic tutorial on integrating Weaverse with your Shopify Hydrogen project. Keep an eye out for our next blog, where we'll delve into more advanced features like using schema, loaders in Weaverse Components.
References:
-
Demo repository: https://github.com/Weaverse/Naturelle
-
Documentation: https://weaverse.io/docs/migration/8384952-migrating-hydrogen-project-to-weaverse
Reactions
Join the Discussion
Continue Reading
More insights from the Weaverse team

AI Coding Agents Just Raised $9B — Here’s What That Means for Headless Commerce Builders
AI Coding Agents Just Raised $9B — Here’s What That Means for Headless Commerce Builders Replit just raised $400 million at a $9 billion valuation. That’s not just a startup funding headline. It’s a market signal. AI coding agents have moved from novelty to infrastructure. They are no longer just autocomplete tools. They can now scaffold apps, debug code, ship features, and increasingly manage larger chunks of the software workflow with minimal human input. Latent Space framed it well: coding is becoming “approximately solved.” But for commerce builders, that does not mean the hard part is over. It means the bottleneck is moving. The new challenge is no longer just writing code faster. It’s turning AI-generated code into storefronts that actually perform, convert, and stay maintainable inside a fast-changing commerce ecosystem. That is where headless commerce builders need to pay attention. The $9B signal is bigger than Replit A $9B valuation on an AI coding platform tells you something important: software creation is becoming agent-driven. That changes expectations for everyone building digital products. Soon, more founders, marketers, merchants, and operators will expect to: describe a product in plain language generate an app or storefront scaffold instantly deploy quickly iterate with AI as the default workflow This is what people call vibe coding. And yes, it’s real. But in ecommerce, generated code is only the starting point. Because a storefront is not just an app.It is a revenue system. Why generic AI coding breaks down in commerce AI coding agents are getting better at: generating React apps wiring CRUD flows producing UI components deploying prototypes speeding up iteration loops What they still do poorly is understanding commerce-specific complexity. A generic agent can scaffold a storefront. It usually cannot reason deeply about: Shopify Storefront API patterns SSR and edge caching strategy product and variant architecture collection and merchandising logic section-based visual editing market-aware storefront behavior conversion-sensitive UX decisions long-term maintainability for merchant teams That gap matters. Because in headless commerce, speed alone is not the advantage.Useful speed is. Shipping the wrong architecture faster is still a loss. Shopify is making the stack more powerful — and more demanding At the same time AI coding agents are getting stronger, Shopify is pushing deeper into a full-stack commerce platform model. The platform is evolving across: APIs checkout discounts identity analytics fulfillment personalization AI-facing commerce infrastructure That means builders need to keep up with a stack that is not getting simpler. For headless teams, this raises the bar. You are not just building a frontend anymore.You are building on top of a moving commerce operating system. In practice, that means AI-generated code needs to work with: Shopify API changes Hydrogen conventions real merchant workflows structured data requirements performance expectations ecosystem constraints That is why generic code generation is not enough. The real shift: from code generation to domain execution This is the part most people miss. The future is not AI replacing builders.The future is AI compressing low-level implementation work so the real differentiator becomes domain judgment. For headless commerce, that means the winners will combine: AI speed Shopify-specific expertise production-ready architecture merchant usability conversion understanding That combination is much more valuable than raw code output. A merchant does not actually want “an app generated by AI.” They want: a storefront that launches faster a stack that is easier to manage pages that convert flexibility without chaos better collaboration between developers and operators That is a different problem. Why this matters for Hydrogen builders Hydrogen teams are in an interesting position. On one hand, AI coding agents make it easier than ever to scaffold headless storefronts, prototype layouts, and speed up frontend implementation. On the other hand, Hydrogen projects still require real decisions around: route structure server rendering data loading API boundaries component architecture storefront performance content operations merchant editing experience This is exactly where many AI-generated builds fall apart. They look fine in a demo.They become expensive in production. That is why the next phase of headless commerce is not about replacing builders with AI. It is about giving builders better leverage. Where Weaverse fits This is why Weaverse matters more in the age of AI coding agents, not less. If AI can generate storefront code faster, the last-mile problem becomes even more important: How do you turn generated storefronts into merchant-friendly, production-ready commerce systems? That is where purpose-built headless tooling wins. Weaverse gives teams: a Shopify-native headless workflow section-based visual editing a stronger bridge between developers and merchants reusable Hydrogen storefront patterns faster iteration without giving up structure In other words: AI helps generate.Weaverse helps operationalize. That is the real leverage. Because merchants do not want infinite frontend freedom if it creates maintenance debt. They want: speed and control flexibility and structure AI acceleration and commerce readiness The winning stack in 2026 The best stack for headless commerce teams is starting to look clear: 1. AI coding agents for speed Use them to: scaffold prototype refactor generate repetitive implementation work accelerate build loops 2. Shopify APIs for infrastructure Use Shopify for: commerce primitives catalog checkout identity discounts markets ecosystem reliability 3. Purpose-built headless tools for execution Use platforms like Weaverse to: make Hydrogen stores merchant-friendly reduce implementation drag preserve structure support production workflows that generic AI tools do not understand This is the stack that closes the gap between “it was generated” and “it actually works.” Practical playbook for teams right now If you are building Shopify storefronts in 2026, here is the move: Use AI coding agents for: initial scaffolding boilerplate generation rapid experiments repetitive component work debugging and iteration support Do not rely on them alone for: architecture decisions storefront performance strategy merchant editing systems data modeling conversion-critical flows long-term maintainability Pair them with Weaverse when you need: visual editing on top of Hydrogen reusable section architecture a cleaner developer-to-merchant handoff faster launches without custom-theme chaos That is how you turn AI speed into real commerce output. Final takeaway Replit’s $9B moment matters because it confirms something bigger than one company: AI coding is becoming table stakes. But in commerce, code generation is not the moat. The moat is knowing how to turn generated code into storefronts that sell, scale, and stay operable. That is why the future is not AI or human expertise. It is AI speed × domain knowledge. And that is exactly where headless commerce builders should focus next. Want to turn AI-generated storefront momentum into production-ready Hydrogen builds?Try Weaverse free at https://weaverse.io. Sources Replit funding / valuation coverage Latent Space on coding agents moving up-stack Shopify developer changelog Additional agentic commerce market coverage

Agentic Commerce on Shopify: How to Make Your Hydrogen Store AI-Agent-Ready in 2026
Agentic Commerce on Shopify: How to Make Your Hydrogen Store AI-Agent-Ready in 2026 AI agents are no longer just helping customers research products. They’re starting to shop for them. That changes what it means to optimize a Shopify storefront in 2026. If a customer asks ChatGPT, Gemini, Copilot, or Perplexity to find the best product for a need, the winning store may not be the one with the prettiest homepage. It may be the one with the cleanest product data, the clearest schema, and the most machine-readable storefront. Shopify sees where this is going. Agentic Storefronts are now live. Universal Commerce Protocol (UCP), co-developed with Google, gives merchants a new path to become discoverable and transactable in AI-driven buying flows. For Hydrogen teams, this shift is not a threat. It is an advantage. Because headless storefronts already separate presentation from data, they are in a better position to serve both humans and machines—if the implementation is done right. The shift: from browse-first to ask-first commerce Traditional ecommerce assumes a human visits your site, clicks around, compares options, reads reviews, and decides. Agentic commerce compresses that flow. Now the customer says: Find me leather boots under $300 Compare the best protein powders without artificial sweeteners Reorder the best moisturizer I bought last time An AI agent handles discovery, comparison, filtering, and, increasingly, transaction steps. In that world, your storefront still matters for human trust and conversion. But your discoverability layer changes completely. Instead of competing only on: branding design merchandising ad creative you also compete on: structured product attributes variant completeness stable identifiers machine-readable policy and offer data feed quality schema quality storefront and API reliability If AI systems cannot parse your catalog confidently, they will simply recommend someone else. Why Shopify merchants should care now This is not theoretical anymore. Shopify has already started building for agentic commerce through: Agentic Storefronts Shopify Catalog UCP stronger machine-readable commerce surfaces improved developer tooling around modern Hydrogen builds The strategic message is clear: commerce interfaces are expanding beyond the browser. Your customer may still buy from a human-facing storefront. But the path to that purchase may begin inside an AI interface that never sees your hero banner, campaign landing page, or carefully tuned homepage flow. That means the old optimization stack is incomplete. A store can look premium and still be invisible to AI-driven discovery. The real bottleneck: bad product data Most merchants do not have an AI-readiness problem. They have a product data discipline problem. This is where many catalogs break down: vague product titles inconsistent variant naming missing GTINs incomplete metafields missing dimensions, materials, or care specs untyped custom data weak or missing Product schema broken canonical relationships across variants For humans, you can sometimes get away with that. For AI systems, you usually cannot. Agents work better when they can rely on structured, typed, normalized inputs. That includes: brand product type size color material dimensions availability price condition fulfillment details review signals return policies If those fields are incomplete, the agent has less confidence. Less confidence means less visibility. Why Hydrogen stores have an architectural advantage Hydrogen teams are better positioned than legacy storefront teams for one reason: the architecture already separates content and data from presentation. That matters because AI readiness is mostly about the quality of the data layer. A well-built Hydrogen store can: output clean JSON-LD from server-rendered routes expose typed metafield data consistently support structured product and collection pages generate machine-readable manifests and feed layers keep storefront UX flexible without compromising data integrity In other words, Hydrogen makes it easier to build a storefront that works for humans on the surface and machines underneath. That is exactly the direction commerce is heading. Where Weaverse fits This is also why Weaverse has a natural position in the shift to agentic commerce. The real opportunity is not choosing between beautiful storefronts for humans and structured storefronts for machines. The opportunity is building both from the same source of truth. With the right Weaverse implementation, teams can: keep merchant-friendly visual editing preserve a structured section architecture flow metafield data into storefront rendering support stronger schema outputs reduce the gap between merchandisers and developers That matters because AI readiness cannot depend on engineers manually patching every product page forever. The system has to be maintainable by the actual team running the store. The 2026 AI-agent-readiness checklist for Shopify + Hydrogen teams If you want your storefront to stay visible in AI-driven shopping flows, start here: 1. Tighten product titles Every title should clearly communicate: brand product type key differentiator Avoid vague naming. Keep titles precise and scannable. 2. Complete variant-level data Every variant should have: accurate size, color, and material data availability price SKU GTIN where applicable 3. Populate critical metafields At minimum, make sure structured data exists for: material dimensions weight care instructions certifications compatibility or use case shipping or fulfillment constraints where relevant 4. Implement JSON-LD properly Support: Product Offer ProductGroup where relevant review and aggregate rating where valid 5. Clean up internal product data logic Make sure data is consistent across: PDP collection cards search results feeds structured data outputs 6. Enable Shopify’s discovery surfaces Where relevant, prepare for: Shopify Catalog Agentic Storefront pathways UCP-compatible discovery patterns as they mature 7. Validate what machines actually see Do not just inspect the page visually. Test structured outputs and rich result eligibility. The mistake merchants will make A lot of brands will hear “agentic commerce” and respond with content theater. They will publish hot takes, add “AI-ready” to landing pages, and bolt on a chatbot. But that is not the hard part. The hard part is cleaning the data model. Because AI visibility is not a branding claim. It is an operational outcome. The winners will be the teams that treat: product data schema identifiers merchandising structure storefront architecture as revenue infrastructure. Final takeaway The future of commerce is not humans versus AI. It is structured backend for machines and compelling frontend for humans. That is the middle ground Shopify is moving toward. And it is exactly where Hydrogen and Weaverse can win. If your storefront cannot pass the AI-agent parse test, you will lose demand long before a customer ever reaches your site. Want to make your Hydrogen store AI-agent-ready without sacrificing visual control? Build it with Weaverse. Start free at https://weaverse.io.

ChatGPT Quit Agentic Commerce. That Doesn't Mean You Should.
ChatGPT Quit Agentic Commerce. That Doesn't Mean You Should. Two posts this week confirm the same signal: Juozas Kaziukėnas: ChatGPT is abandoning agentic commerce after 5 months. Users researched products but didn't buy through the chatbot. Kelly Goetsch: OpenAI is losing ground to Anthropic and deprioritizing commerce because enterprise commerce is harder than they expected. The headlines say "AI commerce is failing." The real story is more nuanced. Why They Retreated Agentic commerce — AI agents that discover, compare, and complete purchases on behalf of users — hit three hard walls: 1. Catalog Normalization Is Brutal Product data (pricing, inventory, variants, availability) needs to be: Standardized across every retailer Constantly updated in real-time Accurate enough for AI to trust Only Google Shopping has done this at scale. ChatGPT couldn't. 2. Trust Gap: Research ≠ Purchase Users were happy to research products inside ChatGPT. But when it came time to buy, they didn't trust the chatbot with payment. This isn't a ChatGPT problem — it's a user behavior problem. Facebook Shops and Google's "Buy with Google" hit the same wall. 3. Fraud and Error Safeguards Commerce and payment firms need real safeguards against: AI initiating fraudulent transactions AI making erroneous purchases Liability when something goes wrong These safeguards don't exist yet at scale. Without them, platforms retreat to just driving traffic to retailer sites. What They're Not Saying This is a pause, not a permanent retreat. Kelly Goetsch explicitly predicts: "they'll re-prioritize commerce in a few months once they figure out the infrastructure layer." Juozas Kaziukėnas frames it as lack of conviction: Chinese AI platforms like Alibaba's Qwen are spending hundreds of millions to force the behavior change. ChatGPT gave up too early. Either way, they'll be back. The question is: will your store be ready? The Infrastructure Layer Wins Long-Term When AI platforms return to agentic commerce, the stores that win won't be the ones with the prettiest themes or the best brand storytelling. They'll be the ones with: Structured product data that agents can read and reason about Clean APIs that don't break under automation Checkout flows with real safeguards and clear liability boundaries Machine-readable manifests (like UCP's ucp.json) that broadcast capabilities to agents This is exactly what Hydrogen + Storefront API architectures are built for. Why Hydrogen Teams Have a Structural Advantage Monolithic Liquid stores have product data trapped in rendered HTML. AI agents have a hard time reasoning over server-rendered markup. Hydrogen stores built on the Storefront API already expose: Structured, queryable product data Stable cart and checkout mutations Clean authentication via Customer Account API Market-aware URLs for localized experiences Adding UCP support or similar agent-ready layers is an extension of the architecture, not a rewrite. What You Should Do While Big Platforms Regroup 1. Audit your data layer Can an AI agent query your product catalog via clean API? Or is your data trapped in theme templates? 2. Check your checkout safeguards Do you have clear boundaries for what automated systems can and can't do? Fraud detection? Liability clarity? 3. Make your capabilities machine-readable If you're on Hydrogen, you're most of the way there. The next step is declaring your capabilities in a format agents can discover. 4. Don't wait for platforms to figure it out The stores that win agentic commerce won't be the ones who waited for ChatGPT to solve catalog normalization. They'll be the ones who made their data clean, their APIs stable, and their checkout safe — before the next platform tries again. The Honest Take Agentic commerce is harder than the hype. The platforms with the biggest AI models just hit the wall. But the infrastructure layer still wins. If your store is machine-readable, API-first, and checkout-safe, you become the integration backbone for whichever platform eventually cracks it. The platforms quit early. That doesn't mean you should. Sources Juozas Kaziukėnas on ChatGPT abandoning agentic commerce: https://www.linkedin.com/posts/juozas_chatgpt-is-abandoning-agentic-commerce-its-activity-7435308306329473025-Ncy0 Kelly Goetsch on OpenAI deprioritizing commerce: https://www.linkedin.com/posts/kellygoetsch_feels-like-openai-is-quickly-losing-ground-activity-7435323329483460608-GgKK Shopify headless architecture: https://shopify.dev/docs/storefronts/headless
Never miss an update
Subscribe to get the latest insights, tutorials, and best practices for building high-performance headless stores delivered to your inbox.
