

Translation Feature Guide
This guide shows how to set up and use theTranslation Manager in Weaverse Studio to localize your storefront — reusable theme strings and page content — with AI auto-translation and a built-in review step.
Overview
Translation Manager localizes two kinds of content inside a Weaverse project:
Theme content: reusable storefront strings like button labels, empty states, and helper text (from your theme schema’si18n.staticContent).Page content: text and image content extracted from your page sections, blocks, and elements.
This is a different layer from the Hydrogen i18n loader (
schema.server.ts / loadPage()), which controls how a published storefront reads translations at runtime. Use the i18n loader to wire locales into your theme (see Markets and Localization); use the Translation Manager to actually produce the translations.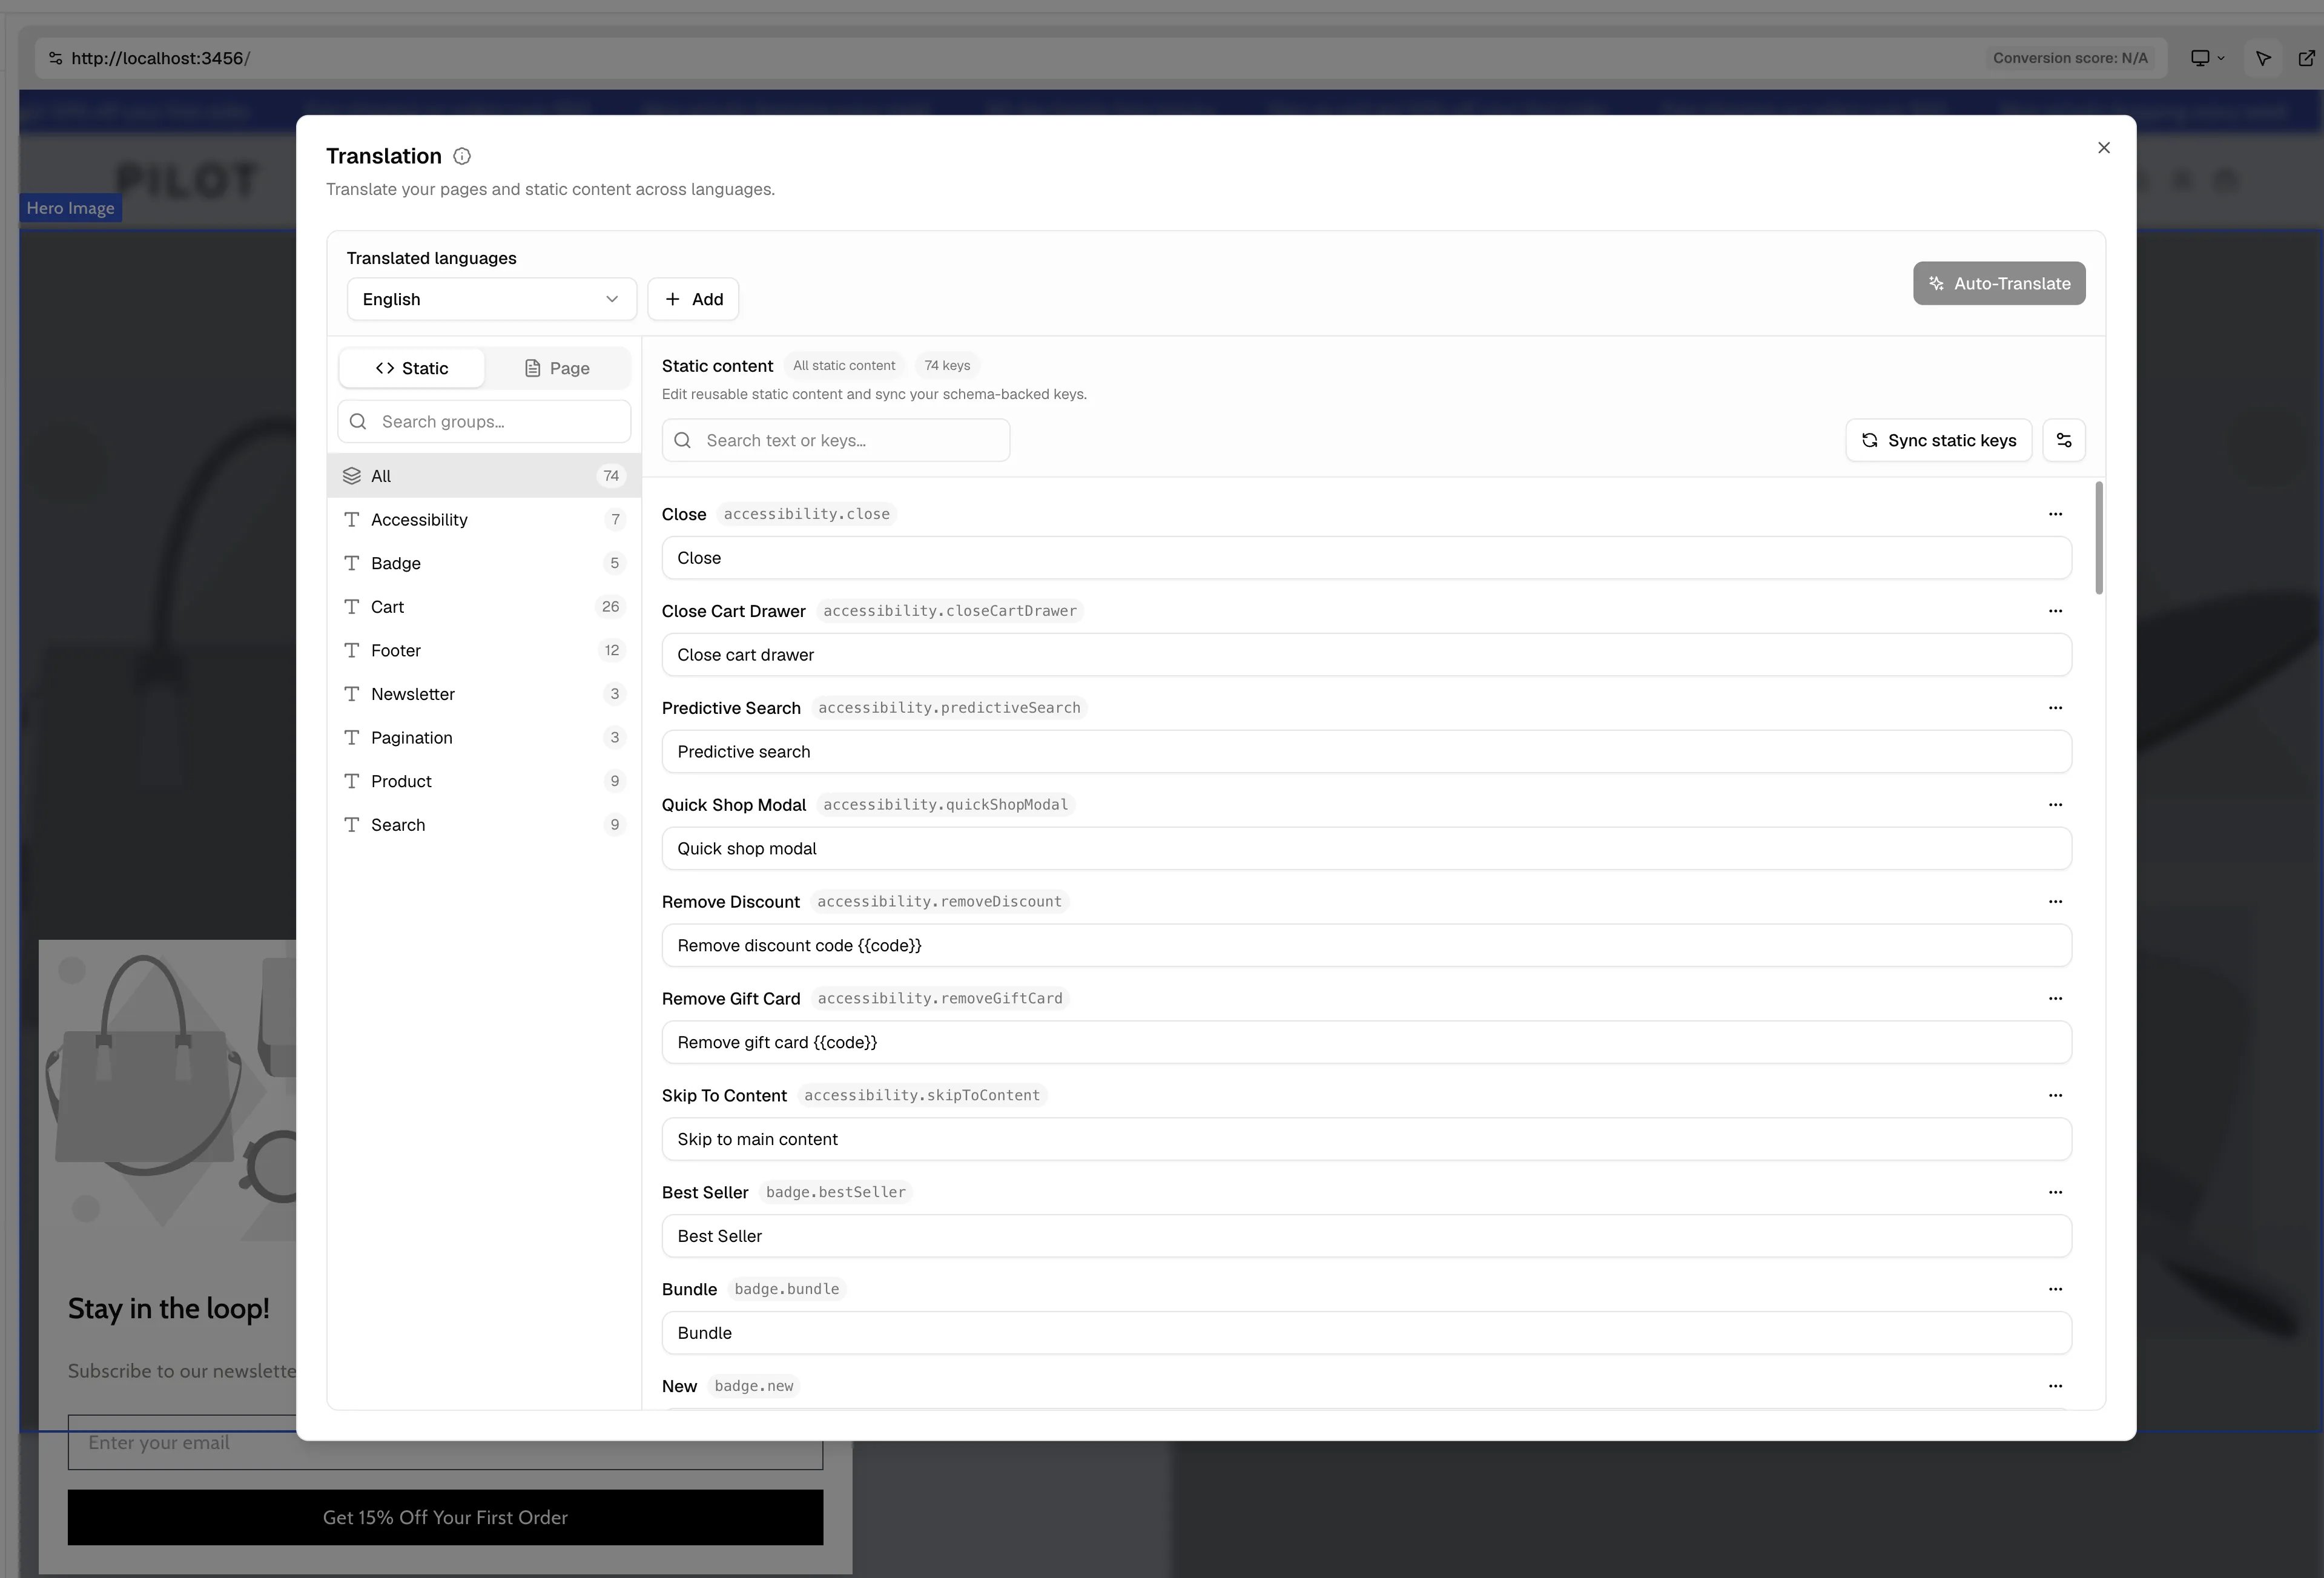
Core concept: Market vs. Language
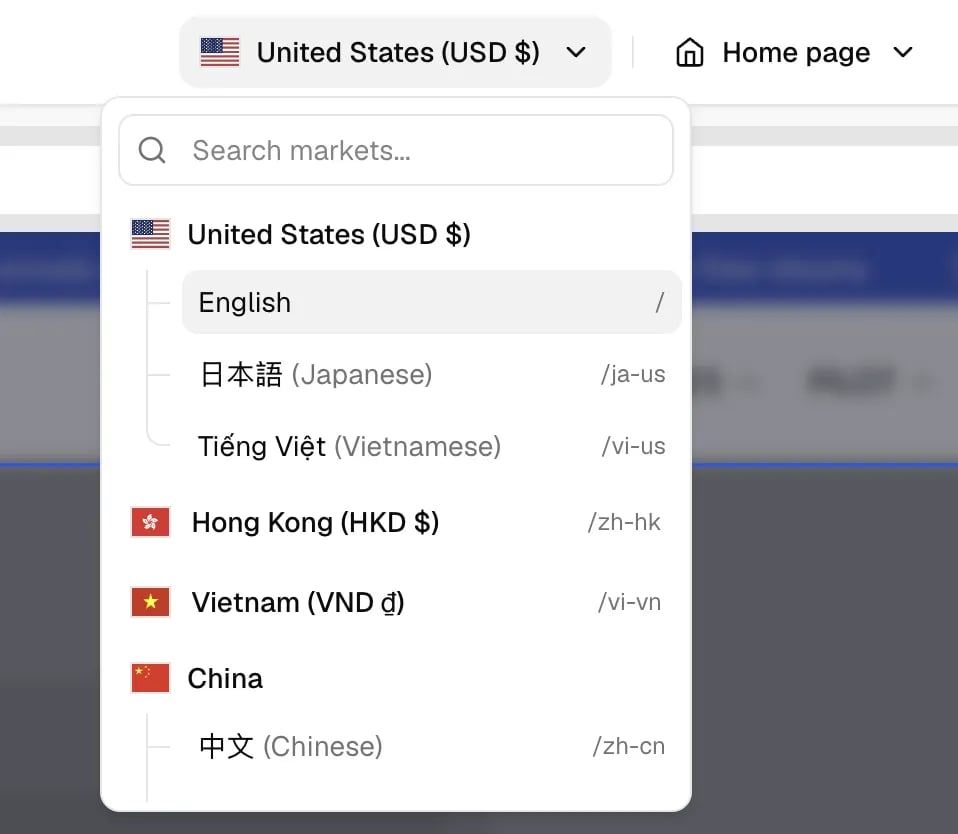
Weaverse separates what region a page targets from what language it is read in. Understanding this split is the key to using the Translation Manager well.
A market owns the page layout and the source content. Languages are overlays on that one layout. So a Vietnam market that sells in both Vietnamese and English is built once — you only translate the copy, you don’t rebuild the page per language.
Legacy vs. market-first projects
How a project keys its content depends on when it was created:- Market-first projects (new) — content is keyed by market. One page per
(market, type, handle), with language as a pure translation overlay. This is the model the Translation Manager is built for: edit once, translate everywhere. - Legacy projects (older) — content is keyed by full locale (
vi-vn,en-vn,vi-us). Each language of the same country is a separate page you must author and maintain by hand, even when the layout is identical.
Before You Start
Make sure these pieces are in place before your team starts translating:- You have installed
@weaverse/hydrogenversion^5.16.3or higher in yourpackage.json. - Your project has a valid default locale configured.
- The latest page content is published.
- Your theme exposes reusable strings through
schema.i18n.staticContentif you want to translate theme-level text, and setsi18n.translation: true.
- The first time
Translation Manageropens, it auto-creates the default language from the project’s default locale. - Page scans read from the last published version of the project, not from unpublished editor changes.
- Theme-level translation keys come from the theme schema, so they need to exist there before they can be synced and translated.
If the manager shows “Translation feature is not configured for this project,” your theme schema is missing
i18n.translation: true. Add it (below) and reload Studio.Theme Setup
If your project needs translatable theme strings, create a file (e.g.app/i18n/en.json) to store your keys:
i18n.staticContent. You must also set i18n.translation: true to enable and display the Translation Manager in Studio.
- Keep keys structured in a multi-nested object format.
- Use stable keys that describe the UI meaning, not the current copy.
- Treat these default values as the source-language content for your project.
Editing theme strings from global theme settings
By default,i18n.staticContent keys are only editable inside the Translation Manager. If you want merchants to edit a specific string (or swap a per-language image) right from global theme settings, expose it with one of two dedicated input types:
These input types require
@weaverse/hydrogen 5.20.1 or higher (which ships @weaverse/schema 0.14.0). On earlier versions TypeScript rejects them with “Type 'translation-image' is not assignable to type InputType.”The one rule that makes these different
For every other input type,name is the component prop that receives the value. For these two, name is a dot-notation key into i18n.staticContent — the same key you pass to t().
t() is the only way to read them back.
Declaring them in the theme schema
Add them to the theme schema’ssettings array, which is a list of { group, inputs } groups:
name must match a key that already exists in your i18n.staticContent JSON — that file stays the source of truth for the default language.
Reading the values back
Exactly as you would any other theme string — witht():
Per-language images
translation-image stores an image URL rather than a sentence, so a merchant can ship different artwork per language — a banner with baked-in text, a locale-specific badge, a regional payment logo.
Alt text is not bundled in. Pair the image with its own translation-key input:
t() lookup — the image one returns a URL string:
The two content scopes
The manager splits everything translatable into two scopes, shown in the left navigation: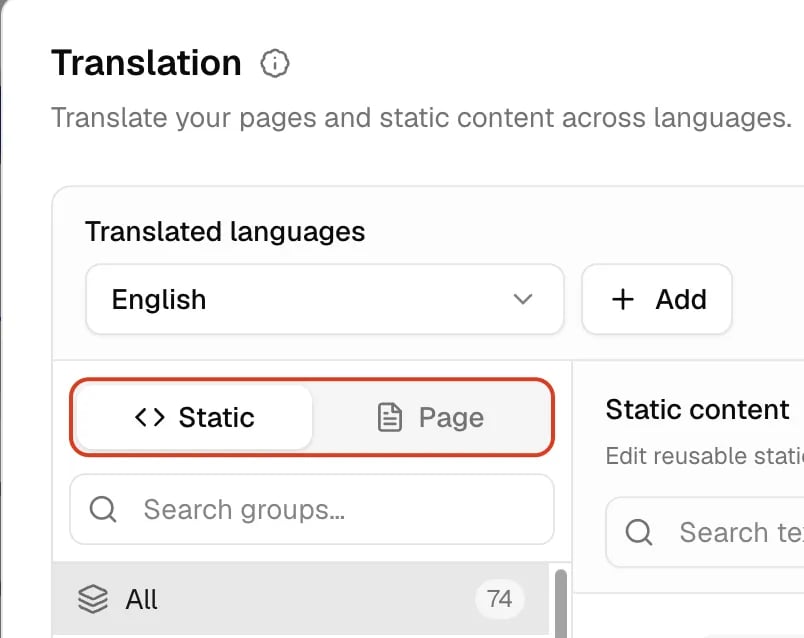
Open Translation Manager
In Studio, click the Advanced features icon in the topbar to open Translation Manager: Advanced features → Translation → Translation Manager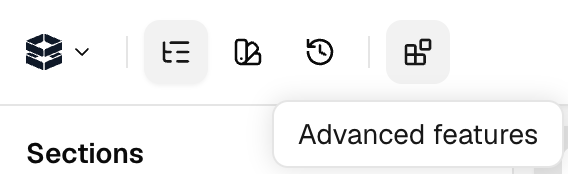
- Detect the project’s default locale.
- Create the default language record if it does not exist yet.
- Load the current language, theme content, and page content (a short initialization/scan runs once).
Add a Language
To add a translation target:- Click
Add. - Search and pick the target language you want to support.
shopLocales your Hydrogen i18n config reads). To add a brand-new locale to your storefront routing first, see Markets and Localization.
Translate Theme Content
Use theTheme scope for project-wide UI strings.
Default language mode (selected language = default):
- Click
Sync Theme Keysto import keys fromschema.i18n.staticContent. - Edit the default values directly.
- Changes save automatically.
- Open the
Themescope. - Review the source values on the left.
- Click
Auto-Translateto generate first-pass translations, or type translations on the right. - Refine any strings that need tone or brand adjustments. Edits save automatically.
Translate Page Content
Use thePage scope for page-specific content.
- Switch to
Page. - Pick the page you want to translate from the sidebar (untranslated counts are shown per group).
- Choose
Text ContentorImage Content. - Edit translated values inline next to the source.
- Use the
Untranslatedfilter or search to focus on what’s missing.
Auto-Translate pages
ClickAuto-Translate (the ✨ button in the toolbar). With the Page scope active, a page picker opens so you choose what to translate:
- Select the current page to translate one page.
- Select several pages or all pages to run a background translation job.
- Track long-running jobs from the progress indicator — you can keep working while they run. The button is disabled for a language while its job is active, so you can’t double-submit.
Bulk workflows: Import / Export
For large catalogs or external translation vendors, move translations in and out as files:- Export — download a page’s translations as CSV or JSON. CSV columns are
Item ID, Key, Path, Original Value, Translated Value. - Import — upload a translated CSV or JSON back into a target language. Keep the export column shape so rows map to the right items.
How Translations Apply To The Project
The feature applies translations in two different ways:- Theme content: Stored as project translation keys. Use the
useTranslationhook (below) in your frontend components so these strings render dynamically based on the active locale. - Page content: Stored separately from the main page JSON. Weaverse automatically applies these localized strings at runtime. You don’t need to add any code, hooks, or rendering logic to your Weaverse sections — Weaverse Hydrogen components automatically display the translated text when a non-default locale is requested.
Recommended Workflow
For the smoothest rollout, use this order:- Finalize the default-language content first.
- Publish the latest page changes.
- Sync theme keys.
- Add the target language.
- Auto-translate theme content.
- Auto-translate page content.
- Review high-visibility strings manually.
- Preview the localized storefront and QA important flows.
Video walkthrough
Walkthrough video coming soon.Troubleshooting
- Manager not showing / “not configured”: the theme schema is missing
i18n.translation: true. Add it and reload Studio. - A language I sell in isn’t listed: publish the locale in Shopify first; languages come from the store’s published locales. The manager will also prompt you to add a missing language when you open it on that locale.
- Page edits don’t show on the live non-default site: make sure you edited the target language column (not the default) and that the row shows a saved state. On legacy (per-locale) projects, each locale is a separate page — see Legacy vs. market-first above.
- Strings stay untranslated after Auto-Translate: re-run Auto-Translate for that page/language, or fill the remaining rows by hand. Use the
Untranslatedfilter. Static keys not declared ini18n.staticContentwon’t appear. - Static / theme keys missing: run
Sync Theme Keysin the Theme scope, and confirmschema.i18n.staticContentexists. - Source language changed: use
Re-sync Keysinstead of recreating all translations. Type '"translation-image"' is not assignable to type 'InputType': your installed@weaverse/schemapredates these input types. Upgrade to@weaverse/hydrogen@5.20.1or higher, which pins@weaverse/schema@0.14.0. Upgrading@weaverse/schemaalone is not enough if@weaverse/hydrogenstill pins an older version — check withnpm ls @weaverse/schema.- A
translation-keyinput shows nothing in Studio: itsnamemust match a key that exists ini18n.staticContent. Unlike other inputs,nameis a content key, not a component prop — a typo silently yields an empty field.
Limits & behavior
- AI drafts, not final — always review. Translations preserve HTML tags, whitespace, and variables, and keep tone, but aren’t a substitute for human QA on high-visibility copy.
- Background jobs — large auto-translate runs are queued and processed in the background; one active job per language at a time.
- Provider — runs through the Weaverse AI proxy with automatic model failover, so a single provider outage doesn’t break a run. AI calls have cost, so prefer translating only the pages you changed.
- Published content only — page scans read the last published version, not unpublished editor changes.
Rendering Translations in the Theme
To use translated theme content in your components, use theuseTranslation hook from @weaverse/hydrogen. It connects to your theme’s static content and the localized strings managed in the Translation Manager.
- Import the hook:
- Use the
tfunction to render localized strings:
- Simple string interpolation: mark variables in your source JSON with double braces (e.g.
{{name}}), then pass an object of variables as the second parameter tot:
Advanced: Pluralization with i18next
By default, thet function from useTranslation only supports simple string substitution (e.g., {{variable}}). It does not natively support advanced formatting like plurals.
If your application requires plural forms or other advanced i18n features, configure an i18next instance and pass it as a custom translation function to Weaverse using the withWeaverse wrapper. For full step-by-step instructions, read the dedicated i18next Integration Guide.
Translating Shopify Content
Weaverse’s Translation Manager handles your storefront’s theme UI strings and custom page content. Your core catalog data (Products, Collections, Blogs, Articles, Menus) natively resides in Shopify. How to translate catalog data: localize your core Shopify catalog within the Shopify Admin using Shopify’s free Translate & Adapt app or any compatible 3rd-party translation app. How to query translated data: include the@inContext directive with the localized language and country codes in your GraphQL queries.
context.storefront.query(...)), Hydrogen passes the correct language prefix automatically (e.g., /fr/products/hoodie), so Shopify returns translated strings natively and your Weaverse sections simply render product.title.
Programmatic access (coming)
Today every Translation Manager endpoint is authenticated by the Shopify shop session, so it’s only callable from inside Studio. A partner write-API (API-key auth for edit-once, AI-translate-everywhere automation from outside Studio) is being scoped.Summary
UseTranslation Manager to manage page content and reusable theme copy in one place. Author once in your default language, add target languages, auto-translate, review, and Weaverse applies the localized content at runtime. On market-first projects, you translate once per language and it serves every market that shares that language — so finalize your source content, then let the manager do the rest.
Related
- Markets and Localization — wiring locales into your Hydrogen theme.
- Advanced Localization Guide — locale detection internals and the
localeparameter. - i18next Integration Guide — pluralization and advanced formatting.